 Save
Save My kids discovered these pops one sweltering summer afternoon when the ice cream truck had already passed and I'd somehow run out of proper desserts. I grabbed the bananas on the counter, a jar of peanut butter, and a block of chocolate—more out of desperation than inspiration—and forty minutes later, they were calling them "better than store-bought." Now they show up at every neighborhood gathering, and I've stopped trying to remember whose idea it was first.
I made a triple batch for my neighbor's birthday party last month, and they disappeared faster than the chips. Three adults asked for the recipe right there on the porch, which felt like the highest compliment possible. Something about the contrast—cold, creamy, then that snap of chocolate—gets people reaching for seconds without thinking.
Ingredients
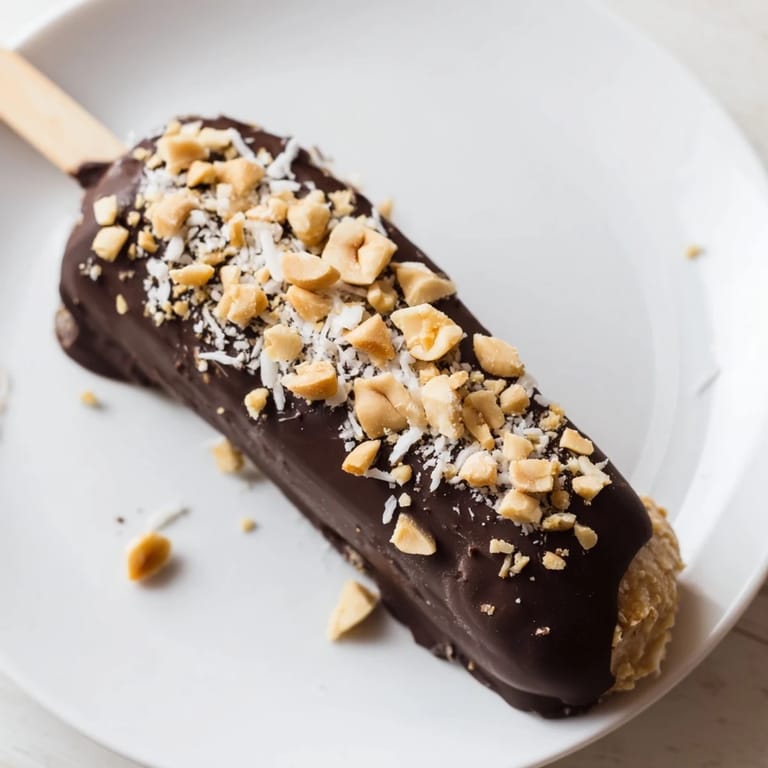
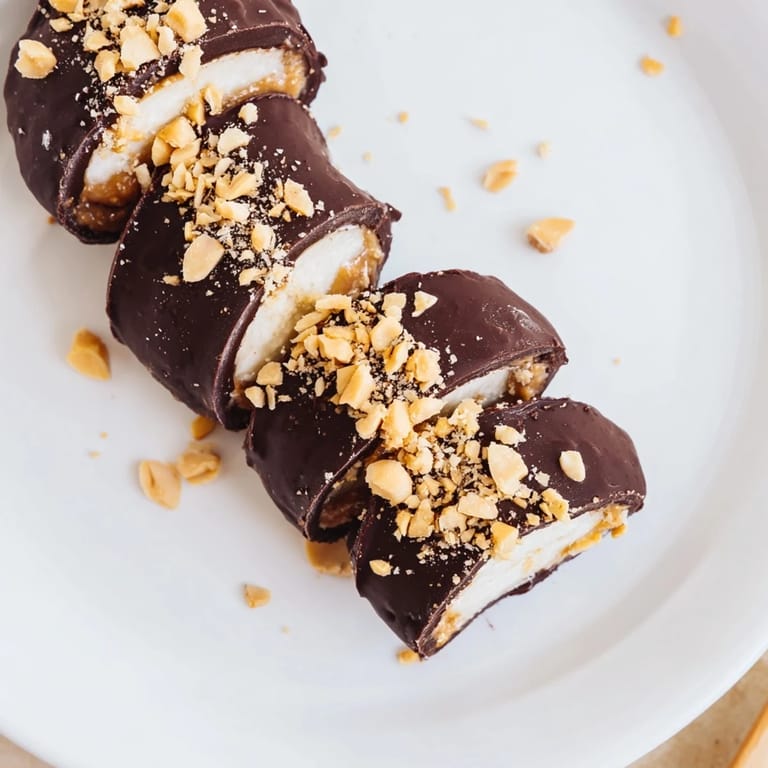
- Ripe bananas (4 medium): Look for ones with a few brown speckles; they're sweeter and freeze beautifully without turning to mush.
- Creamy peanut butter (8 tablespoons): The smoother the better—chunky versions make the coating uneven, which sounds silly but matters when you're dunking.
- Dark or milk chocolate (200 g): Chopped small so it melts evenly; dark chocolate makes them less overwhelmingly sweet, but milk chocolate is the crowd-pleaser.
- Roasted peanuts (¼ cup, chopped): The crunch is the whole point here—toast your own if you have time, but store-bought works fine.
- Shredded coconut, mini chocolate chips, sprinkles (¼ cup each): Mix and match based on what you like; I usually skip the sprinkles and double down on coconut.
Tired of Takeout? 🥡
Get 10 meals you can make faster than delivery arrives. Seriously.
One email. No spam. Unsubscribe anytime.
Instructions
- Prepare your bananas:
- Peel and cut each banana in half crosswise, then insert a wooden stick firmly into the cut end. Make sure the stick goes deep enough to hold, or they'll slip off mid-dip later and honestly, that moment of panic isn't fun.
- Freeze the base:
- Line a baking tray with parchment paper, arrange your banana pops, and freeze for a full hour until they're rock solid. This matters—soft bananas turn into mush when you coat them.
- Apply the peanut butter layer:
- Spread one tablespoon of peanut butter over each frozen banana half with a small spatula, working smoothly. Take your time here; the uneven spots are where chocolate gets thin.
- Re-freeze briefly:
- Give the peanut butter layer fifteen minutes in the freezer so it sets firm. This is when you should prep your toppings and melt your chocolate.
- Melt the chocolate:
- Use a double boiler (heatproof bowl over simmering water) or microwave in thirty-second bursts, stirring between each one. Chocolate seizes instantly if it gets too hot, so go slow and don't leave it unattended.
- Dip and coat:
- Working quickly, dip each pop into the melted chocolate, turning to coat all sides evenly. Let the excess drip off back into the bowl, then move to your topping station immediately.
- Add toppings:
- Sprinkle your chosen toppings right away while the chocolate is still tacky—this is the fun part and where creativity happens. If you hesitate, the chocolate sets and nothing sticks.
- Final freeze:
- Return the pops to the parchment-lined tray and freeze for at least an hour until the chocolate is completely hard. An hour and a half is better; rushing this step means chocolate that slides off when you grab it.
 Save
Save Last winter my daughter presented these to her art teacher as a thank-you gift, wrapped in tissue paper like something precious. The teacher came back the next week asking if there was more. That's when I realized these pops were more than just a quick dessert—they were something people actually wanted to give away.
Variations That Actually Work
White chocolate is a total game-changer if you're tired of dark chocolate dominance; it's sweeter and pairs oddly well with coconut. Swapping peanut butter for almond butter makes them feel fancier somehow, even though you're doing exactly the same thing. I've also tried coating half in dark and half in milk chocolate on the same pop, which lets everyone in the house find their preference without making two batches.
Keeping Them Perfect
Store these in an airtight freezer container, and they'll stay fresh for about a week before the chocolate gets a slight bloom or the banana texture changes. If you're making them ahead for a party, freeze them without the toppings, then dip and coat them the day before you serve—it feels less stressful and tastes just as good.
Making It Your Own
The beauty of these pops is how adaptable they are to whatever you have on hand or whatever diet you're navigating. Sunflower seed butter works perfectly if peanuts are off the menu, and honestly, some of the best batches I've made came from mixing toppings at random.
- Drizzle with contrasting chocolate (dark over white, or white over dark) for a fancy look that takes thirty seconds.
- Toast your own nuts and coconut in a dry skillet for five minutes to deepen the flavor before chopping and using as toppings.
- Keep them in the freezer for up to a week, then bring to room temperature for thirty seconds if the chocolate feels too hard to bite through easily.
 Save
Save These pops have become my go-to when someone needs a simple dessert or a last-minute gift, and honestly, they've never let me down. Something about homemade frozen treats feels like you're showing someone you actually care.
Recipe FAQs
- → How do I prevent chocolate from melting when serving?
Keep the pops frozen until ready to serve, and serve straight from the freezer to maintain the chocolate coating's firmness.
- → What are good alternatives to peanut butter?
Sunflower seed butter is a great nut-free alternative that maintains creamy texture and flavor.
- → Can I use different types of chocolate for coating?
Yes, dark, milk, or white chocolate all work well, offering varying levels of sweetness.
- → How long should the banana pops freeze before coating?
Freeze the bananas for at least 1 hour until firm before spreading the peanut butter and chocolate coating.
- → What toppings can be added for extra texture?
Chopped roasted peanuts, shredded coconut, mini chocolate chips, and sprinkles add a crunchy, flavorful finish.