 Save
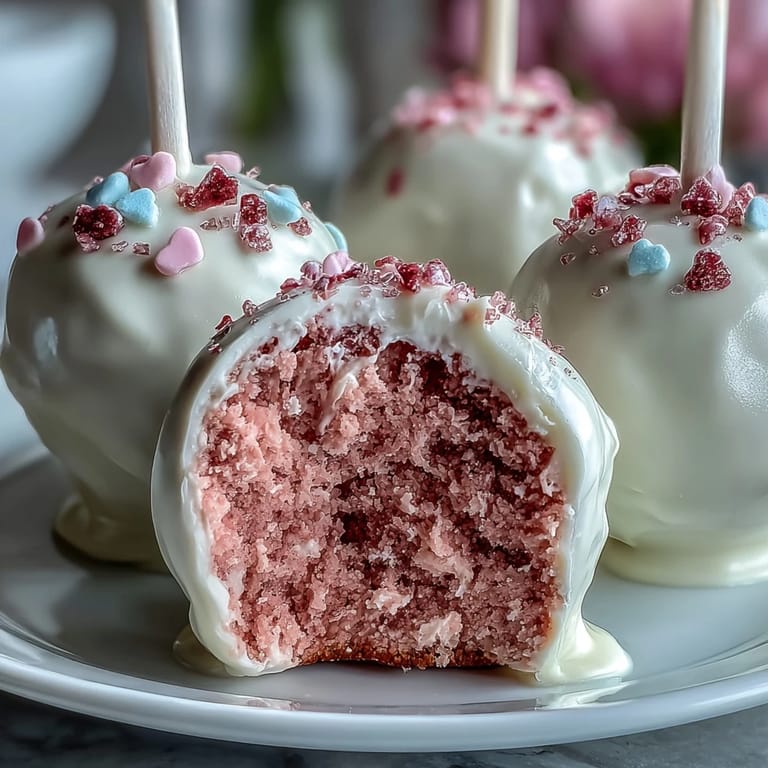
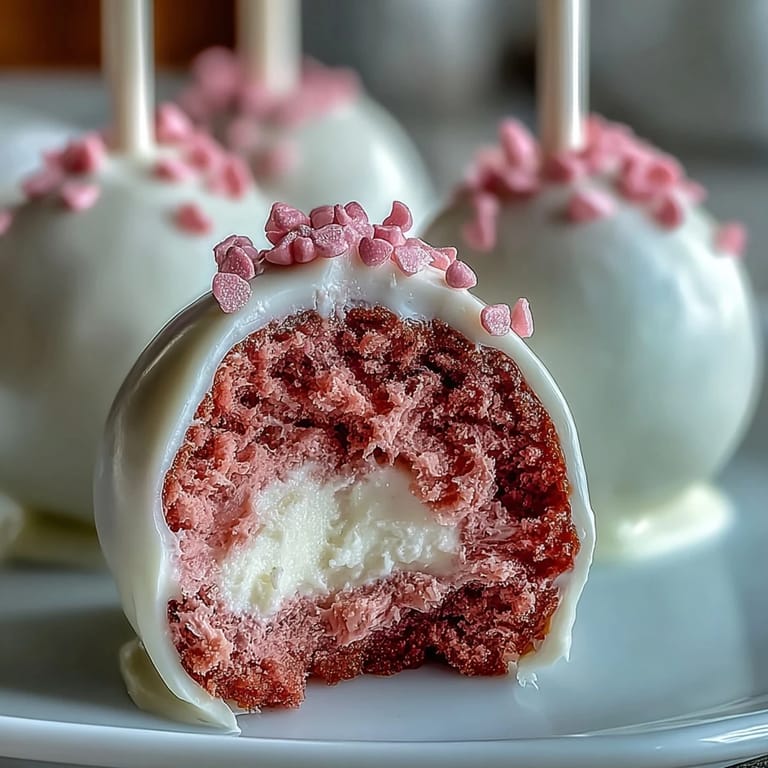
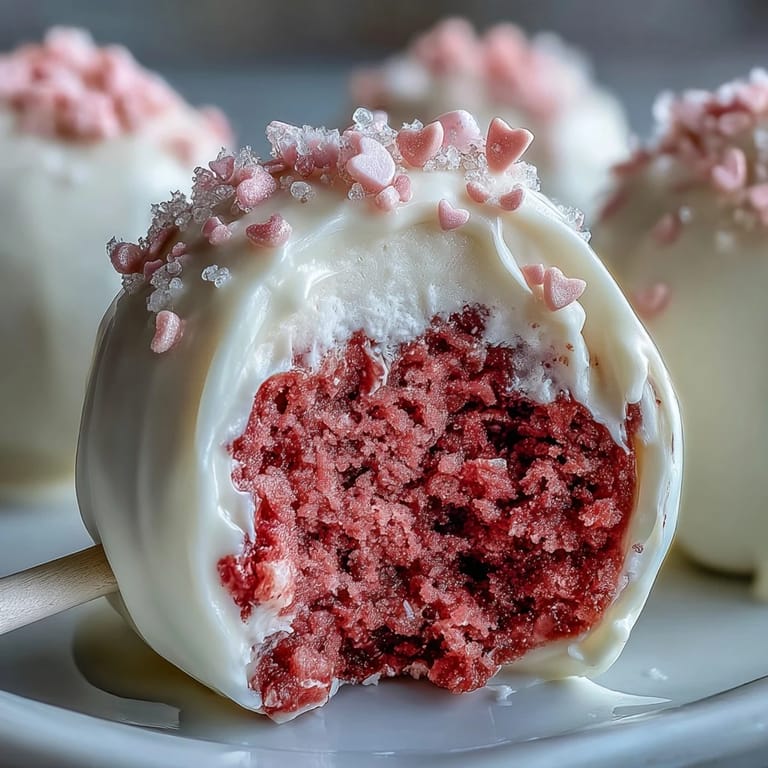
Save My sister texted me a photo of these pink velvet cake pops from some fancy bakery, and I immediately thought, why am I paying for these when I can make them at home? That afternoon, my kitchen smelled like cocoa and vanilla, and by evening I had 24 perfect little spheres coated in white chocolate sitting in my hands. They looked almost too pretty to eat, which is exactly the point when you're making something meant to be shared with people you actually care about.
I brought these to a potluck last February, and watching people's faces when they bit into one and discovered the cream cheese center was genuinely worth every minute of rolling and dipping. One friend asked if I'd gone to culinary school, which felt like the highest compliment I've ever received for something I made in my tiny kitchen on a Tuesday night.
Ingredients
- All-purpose flour: The foundation of your velvet cake, and you'll want it measured by weight if you have a scale to avoid a dry disaster.
- Granulated sugar: This sweetens the cake, but don't skimp on creaming it with the butter at the start.
- Unsweetened cocoa powder: This gives velvet cake its subtle chocolate note without overpowering the pink velvet magic.
- Baking soda: It reacts with the vinegar and buttermilk to make the cake tender and light.
- Salt: Always include it, even in desserts, because it makes every other flavor pop.
- Buttermilk: The tangy liquid that makes this cake impossibly tender and moist.
- Unsalted butter: Softened before mixing so it creams smoothly with sugar.
- Eggs: Room temperature eggs blend more evenly, creating a better crumb structure.
- Vanilla extract: Vanilla paired with vinegar creates that classic velvet cake flavor profile.
- White vinegar: The secret ingredient that gives velvet cakes their distinctive tang and tender crumb.
- Pink gel food coloring: Gel coloring gives you that vibrant pink without watering down your batter like liquid coloring would.
- Cream cheese: Softened so it whips smoothly, and the tangy flavor is essential to this recipe.
- Powdered sugar: Sifted before adding to prevent lumps in your frosting.
- White chocolate or white candy melts: Candy melts are easier for dipping because they're formulated to stay fluid longer.
- Cake pop sticks: The structural support for your little spheres.
Tired of Takeout? 🥡
Get 10 meals you can make faster than delivery arrives. Seriously.
One email. No spam. Unsubscribe anytime.
Instructions
- Prepare your pan and preheat:
- Get your oven to 350°F and line that square baking pan with parchment paper so your cake releases without sticking. A greased pan with parchment is your insurance policy.
- Combine your dry ingredients:
- Whisk flour, sugar, cocoa powder, baking soda, and salt in a bowl, breaking up any cocoa lumps as you go. This distributes the leavening evenly so your cake rises without dense spots.
- Cream the butter:
- Beat butter until it's light and fluffy, which takes about two minutes with an electric mixer. This incorporates air that makes your cake tender.
- Add eggs one at a time:
- Mix each egg in completely before adding the next, then stir in vanilla and vinegar. This gradual approach prevents a broken or curdled batter.
- Alternate wet and dry:
- Add half the dry mixture, then half the buttermilk, then the remaining dry, then the remaining buttermilk, starting and ending with dry ingredients. This prevents overmixing, which would develop gluten and make your cake tough.
- Add the pink color:
- Mix in your gel food coloring until the batter is evenly pink and vibrant. Don't be shy with the coloring; you want it to show.
- Bake until a toothpick comes clean:
- Pour into your prepared pan and bake for 22 to 25 minutes. A toothpick inserted in the center should come out clean with no wet crumbs.
- Cool completely before crumbling:
- Let the cake cool entirely in the pan, then on a wire rack. Warm cake crumbles unevenly and won't hold together properly.
- Make your frosting:
- Beat softened cream cheese and butter until smooth, then gradually add sifted powdered sugar and vanilla, beating until fluffy and spreadable. This frosting is stiff enough to hold your cake pops together.
- Combine cake and frosting:
- Crumble the cooled cake into a large bowl, add all your frosting, and mix until it holds together when pressed. You're aiming for a consistency like thick dough.
- Roll into balls:
- Shape the mixture into 24 balls about the size of walnuts and place them on a parchment-lined baking sheet. They should be roughly even in size so they cook and set at the same time.
- Chill your balls:
- Refrigerate for 30 minutes so they firm up and won't fall apart when dipped. Cold cake pops dip more cleanly.
- Melt your chocolate:
- Use a microwave-safe bowl and melt in 20-second bursts, stirring between each one. This prevents scorching and keeps your chocolate smooth.
- Insert the sticks:
- Dip the tip of each stick into melted chocolate, then push halfway into each ball. Let this chill for 10 minutes so the stick anchor sets.
- Dip and decorate:
- Dip each cake pop into the melted chocolate coating, tap off excess gently, then immediately add sprinkles or candies while the chocolate is still wet. Speed is your friend here.
- Set them upright:
- Place each cake pop upright in a styrofoam block or cake pop stand and let them set completely at room temperature. This takes about an hour.
 Save
Save These cake pops have become my go-to gift when I want to show someone I'm thinking of them but don't want to seem like I'm trying too hard. There's something about the combination of pink, cream cheese, and that tiny moment of discovery when someone bites into one that just feels like affection in edible form.
Making Them Ahead
The best part about these cake pops is that you can bake the cake days in advance and keep it wrapped in the fridge. The crumble-and-frosting mixture can sit in an airtight container for two days, and the shaped balls can chill for three days before you dip them. I usually do my dipping the day I plan to gift them, just so the coating looks fresh and glossy.
Flavor Variations Worth Trying
I started experimenting with different coatings pretty quickly because white chocolate felt a little plain once I'd made the base recipe a few times. Dark chocolate coating against the pink cake and cream cheese frosting creates an almost chocolate-covered strawberry effect, and strawberry-flavored candy melts bring an extra layer of subtle fruit that feels fancy without being complicated. You could also swap the cream cheese frosting for a strawberry frosting if you want to lean into that direction, though the original tangy cream cheese is honestly hard to beat.
Storage and Serving Tips
Keep these in an airtight container in the refrigerator for up to five days, though they rarely last that long in my house. If you need to transport them, pack them carefully so the coating doesn't crack, and they're actually better served straight from the fridge because the white chocolate coating stays set longer than if they're at room temperature.
- Let them sit at room temperature for about five minutes before serving so the cream cheese frosting isn't rock hard.
- If you're making these for a party, prepare them the morning of and keep them chilled until just before guests arrive.
- These freeze beautifully for up to a month if you need to make them even further ahead.
 Save
Save Make these when you want to give your people something they'll actually remember eating. They're small enough to feel like a treat but thoughtful enough to feel like a gift.
Recipe FAQs
- → What gives these cake pops their pink color?
They get their vibrant pink hue from pink gel food coloring added to the cocoa-flavored batter, creating an appealing velvet look.
- → How is the cream cheese frosting incorporated?
The smooth cream cheese frosting is mixed into crumbled cooled cake to form a moldable mixture for shaping the pops.
- → What coating is used on the cake pops?
They are dipped in melted white chocolate or white candy melts, which hardens into a creamy, glossy coating.
- → Can decorations be customized?
Yes, sprinkles, edible glitter, or heart-shaped candies can be added to the coating while still wet for a festive touch.
- → How should these treats be stored?
Keep them in an airtight container in the refrigerator for up to five days to maintain freshness.