Save
Save A friend handed me a tin of hojicha powder at a tea market in Kyoto, insisting it belonged in something sweet. I stared at it for weeks, unsure how to honor that toasty, almost coffee-like depth in a dessert without dairy or eggs. Then one quiet afternoon, the answer arrived—a tender, fragrant cake that somehow tastes both delicate and grounding, layered with clouds of coconut frosting that feels indulgent yet gentle.
I made this for my partner's birthday after a long week, half expecting it to turn out dry or underwhelming. Instead, I caught them sneaking a second slice at midnight, the hojicha-dusted plate sitting by the kitchen window catching moonlight. That's when I knew this cake had something real—it wasn't trying to be anything other than what it was.
Ingredients
- Gluten-free all-purpose flour blend and almond flour: Together they create a tender crumb that actually feels luxurious; the almond flour is doing the heavy lifting here, so don't skip it or substitute.
- Hojicha powder: This roasted green tea is the soul of the cake—use a quality one, not the dusty stuff that's been sitting on shelves for months.
- Baking powder and baking soda: They need each other in gluten-free baking; one alone won't give you that gentle rise.
- Almond milk and apple cider vinegar: This combination creates a vegan buttermilk that actually works, adding tang and tenderness without eggs.
- Maple syrup and coconut oil: Maple brings warmth that pairs beautifully with hojicha, while coconut oil keeps everything soft and gives the cake its signature tender crumb.
- Full-fat coconut milk for frosting: Refrigerate it overnight and only use the solid cream that separates—this is non-negotiable for fluffy frosting.
Tired of Takeout? 🥡
Get 10 meals you can make faster than delivery arrives. Seriously.
One email. No spam. Unsubscribe anytime.
Instructions
- Set up your space:
- Preheat the oven to 350°F (175°C) and line an 8-inch round pan with parchment paper, letting it come up the sides a bit so the cake lifts out clean. Greasing underneath matters—skip it and you'll be fishing cake pieces out of the pan later.
- Make your vegan buttermilk:
- Pour almond milk into a small bowl, add a tablespoon of apple cider vinegar, and let it sit for 5 minutes—you'll see it start to curdle and thicken, which is exactly what you want. This step takes barely any time but makes all the difference in how tender the cake becomes.
- Combine your dry ingredients:
- In a large mixing bowl, whisk together the gluten-free flour, almond flour, hojicha powder, baking powder, baking soda, and salt until everything is evenly distributed. The hojicha powder tends to clump, so really work it through with the whisk.
- Mix the wet ingredients:
- In another bowl, combine the vegan buttermilk, maple syrup, melted coconut oil, and vanilla extract, stirring until they come together smoothly. The mixture will look a little thin, but that's right.
- Bring it together gently:
- Pour the wet mixture into the dry ingredients and stir just until combined—the moment you can't see dry flour, you stop stirring. Overmixing gluten-free batter makes it dense and tough, so trust that brief moment when it still looks slightly underdone.
- Bake with patience:
- Transfer the batter to your prepared pan and smooth the top gently. Bake for 30 to 35 minutes until a toothpick inserted in the center comes out clean with maybe one or two crumbs clinging to it.
- Cool in stages:
- Let the cake sit in the pan for exactly 10 minutes—this lets it set just enough to not fall apart—then turn it out onto a wire rack to cool completely. Rushing this step means a collapsed cake, so be patient even though the aroma is intoxicating.
- Prepare the frosting:
- Open your chilled can of coconut milk and scoop only the solid cream that's separated from the liquid into a clean bowl (save that liquid for smoothies or oat milk). Add maple syrup and vanilla extract, then beat with an electric mixer for about 2 minutes until it's light and fluffy like whipped cream.
- Frost with confidence:
- Once the cake is completely cool to the touch, spread the coconut frosting over the top in broad, gentle strokes using an offset spatula or the back of a spoon. Don't press down or you'll compress the cake underneath.
- Finish with a flourish:
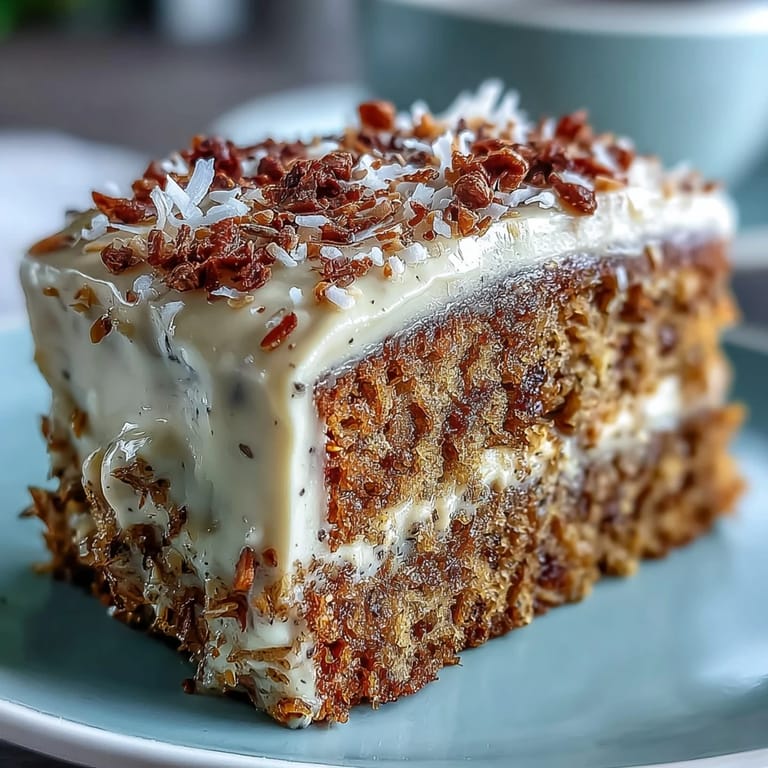
- Dust the frosting lightly with hojicha powder and scatter toasted coconut flakes across the top if you have them. This garnish is small but it tells the whole story of what's inside.
 Save
Save The cake sat on the table as we poured tea—not matcha, but that same hojicha powder steeped in hot water—and suddenly everything made sense. Cake, tea, and conversation folded into one moment, and everyone realized they were tasting something that didn't feel like a compromise at all.
Why Hojicha Works So Well Here
Hojicha has a quieter personality than matcha—less grassy, more like toasted nuts and caramel whispers. When I first baked with it, I worried it might disappear into the cake's sweetness, but the opposite happened. The roasting gives it backbone, so even layered with gentle coconut frosting and almond flour's natural richness, hojicha stays present and interesting in every bite. It's sophisticated without being loud.
Storing and Serving
This cake actually improves slightly after a day in the refrigerator as the flavors meld together, but it's equally wonderful sliced warm from the cooling rack. Keep it covered in the fridge for up to three days, and if you want it to feel special, let a slice come to room temperature for 15 minutes before serving—the frosting softens slightly and everything tastes less cold. Pair it with a light tea, sake, or even black coffee if you want the hojicha to shine even brighter against something bold.
Making It a Celebration
This cake scales beautifully if you want to make two layers instead of one—just double the sponge recipe and bake both in 8-inch pans at the same time, checking them around 28 minutes so they don't overbake. Double the frosting too, and you'll have enough to spread between the layers and crown the top. I've brought this to dinner parties and watched people go quiet when they bite into it—that moment when a dessert turns into a conversation starter is what makes cooking worth the small effort.
- For two-layer cakes, bake both pans simultaneously and adjust frosting quantities accordingly.
- A light dusting of hojicha powder is all you need—too much looks heavy and masks the coconut frosting's delicate sweetness.
- Serve this at room temperature if you can—it tastes more nuanced and tender than straight from the cold.
 Save
Save This cake taught me that vegan baking isn't about replacing things—it's about understanding why each ingredient matters and using what actually works. When you stop thinking about what's missing and start tasting what's there, this becomes the kind of dessert you make again and again.
Recipe FAQs
- → What does hojicha taste like?
Hojicha has a distinctive roasted flavor with nutty, caramel-like notes. Unlike green teas, it's lower in caffeine and has a warm, toasty profile that pairs wonderfully with sweet ingredients like coconut and maple.
- → Can I use regular flour instead of gluten-free?
Yes, substitute the gluten-free flour blend with an equal amount of all-purpose wheat flour. The texture will be slightly different but still delicious.
- → How do I store leftovers?
Keep refrigerated in an airtight container for up to 3 days. The coconut frosting holds up best when chilled. Bring to room temperature before serving for optimal flavor and texture.
- → Why must the coconut milk be refrigerated overnight?
Refrigeration separates the solid cream from the liquid. You only want the thick white cream for fluffy frosting—the reserved liquid works wonderfully in smoothies or other dishes.
- → Can I make this into cupcakes?
Absolutely. Fill cupcake liners two-thirds full and reduce baking time to 18-22 minutes. You'll get approximately 12-15 cupcakes with the same amount of frosting.
- → What can I use instead of almond flour?
Try hazelnut flour for a deeper nutty flavor, or additional gluten-free flour blend. Cashew flour also works well if you need to avoid almonds specifically.